Photography

Aug 242013
 

I ordered a collection of photography brackets to try and come up with a solution to mounting my GH2 on the R-300 a full 90-degrees off from the original mounting position to allow for room for the extra-large NP-F970 Sony camcorder battery. I managed to come up with a few solutions for a compact mount that still allows the GH2 and my 20mm f1.7 lens to function without seeing the edges of the ring light in the frame…

gh2 r-300 mount 01
I started by using 2 90-degree flash brackets. The 2 screw holes to either side of the stock bracket that comes from F&V don’t use the standard 1/4″ threaded holes but instead use a finer 10-24 threaded screw (which I feel is a stronger hold for less torque). The fit is pretty tight and the camera cannot possibly get any closer to the ring light. I really wish F&V could make this light thinner though…

gh2 r-300 mount 03 gh2 r-300 mount 04
I really like the compactness of this arrangement. I think in the future I will look into a fig-rig bracket that may give me a grab handle on either side of the ring light now that it is rotated 90-degrees and see what I can come up with. There is truly no way to make this setup any smaller. I think with a couple of grab handles, I could work with this configuration for long periods of time without any fatigue.

gh2 r-300 mount 05
Even with the camera butting up against the body of the ring light, I still had access to any controls I needed.

gh2 r-300 mount 06 gh2 r-300 mount 07
I next tried a “battery re-locator” accessory that F&V offers. You may have seen this little device in previous posts during my testing. It actually throws off the balance in a rather pleasant way as it is not as front-heavy. The stock bracket from F&V for mounting the camera only allows the camera to get as close as you can see above –but the frame of the ring light was still just outside of view so that’s good. I hate to do it but I may have to cut up the stock bracket to chop off the light mount feature at the bottom because, for hand held use, it is really in the way. I also don’t need the bracket as far back as it goes. Still, I may eventually wind up with a 15mm rail system that is compact enough not to need to butcher the original stuff!

gh2 r-300 mount 08
As you can see, the camera is slightly further away from the ring light so I can actually fit my finger in front of the camera (although not really necessary for hand-held work I’m doing.

Ultimately, I’m not completely sold on either of these configurations as they both have their weaknesses but at least I think I’m getting closer to a solution to using these two products together. I’m still searching for a fig-rig bracket that I can try out and I have 15mm rail brackets on order from China. Wish me luck everyone!!

Aug 162013
 

fv-300 liliput power 001
Turns out F&V makes a perfect battery bracket for a standard Sony camcorder battery. It is normally used to power up to 4 of their light panels from one battery. In my application, I can use the same bracket to power my R-300 ring light and my Liliput field monitor. Both will run on one battery but now that I can divide the power between the two of them from one source, I can start thinking about where to mount the battery to help with the balance of the rig…

fv-300 liliput power 002
I did a simple test to see how long one of these aftermarket extended batteries can run with the light at full power and the field monitor on. The R-300 turned off after 55min and the Liliput kept running for a long enough time after that where I stopped counting! So now I know that I have almost a full hour of time with the system before I need to swap out a battery. The only shame here is that my GH2 camera body doesn’t have the same power specs to run on this system!! I think the camera battery may run out before the rest of the rig does (looks like another test in the making). Still, this is a significant step for me to better balance the camera system and get more control over my peripherals.

Aug 162013
 

fv-300 gh2 rail 001
So I figured it was time to break out the Fotga 15mm rail system I started about a year ago to replace my previous Fig-Rig (see older posts). The 15mm rail adapter bracket from F&V is a fantastic mount for their R-300 light (and far better than their light stand bracket). You can see here, and to my relief, my anamorphic cinema lens fits perfectly to the R-300! So now I’m in the process of putting together an order to get a mess of 15mm rail parts to get this system working. I’m also considering mounting the R-300 above the camera on a second rail set to get it out of the way of accessories that will lay below…

fv-300 gh2 rail 002
Here you can see the other side of the light and the large Sony camcorder battery. It definitely adds some weight to the frame but I’ve got a way to relocate the battery I’ll get into in another post. One thing is for sure, I’m looking forward to using a rail system to have more flexibility in the placement of handles and balancing the weight.

Jul 222013
 

After some further thought (and digging through my camera bag’s collection of lenses) I thought I’d try out additional lenses on my Panasonic GH2 and F&V R-300  ring light before throwing in the towel on what I was hoping to shoot with this combination. Note that I’m still probably going to make some custom rigging to make this an easy hand-held system for run-and-gun shooting…

My first test is my old Vivitar 28mm f2.5 MD-mount. I have used this lens in the past when I needed to shoot video and had to have manual control over the exposure. Although this is an old legacy lens, my video shots came out rather well using it (more on that soon –in another post). In any event, this lens isn’t exactly the same result as my 20mm pancake lens but it’s probably as close as I’m going to get (and also completely manual in operation). Here’s how it fit on the frame:
fv-r300-08 fv-r300-09 fv-r300-10
–As you can see, I can actually fit my hand around the left grip now! Also note that the camera is actually mounted as far back from the light as the stock frame will allow. I was actually a bit surprised by this as I’m sure more full-size DSLR cameras may take up more space than my mirrorless frame. Still, the spacing means that I don’t have to either rotate the light with this setup or try a different power system.

Here’s a shot I got from this arrangement:
fv-r300-11

–In a close shot like this, I can actually see some of the flaws of this legacy glass in terms of sharpness and some fringe issues here and there but for video this is a fantastic piece of glass. Being fully manual also allows me much more control over the exposure –but also means I have to manage the focus all the time…

My next test was with the “kit lens” that came with the purchase of my camera body from Amazon. I’ve really only used this lens a couple of times where I needed zoom and autofocus during a video shoot. I’m actually hoping to make use of the large black lens in the background of most of these shots (to the right) for such jobs in the future but haven’t got it working yet. The zoom feature was actually necessary when working with the ring light to push the lens slightly forward to pass the light enough not to be visible in the outer corners of the shots:
fv-r300-12
fv-r300-13
–Although I don’t actually see me using this lens too much in the future for my work, it has definitely turned out to be the best result when working with this ring light. I was very surprised with the sharpness from this lens.

Here’s a sample shot using this configuration:
fv-r300-14
–Note that there has been no touch-up of this photo (like I would usually do). This is exactly what came out of the camera!

So, in conclusion, although I am not able to use my main “go-to” lens choices as I was hoping with this ring light, I may still have some good options anyways! I’ll keep you all posted as things develop…

Jul 212013
 

So I recently got around to purchasing a F&V R-300 Ring Light. For the type of video shoots I intend to do, I had hoped that this would immediately improve things but, as always, there are some new hurdles to overcome. Below you can see how the R-300 interfaces with my GH2 along with a L-series Sony battery on the side. I have the camera as far forward as can be mounted with the bracket from F&V.

fv-r300-01
–In this configuration, I’m using the 20mm f1.7 pancake lens as it is my go-to choice for most of my shots.

Here are some photos taken in this configuration:
fv-r300-02
–In this shot, I have just one filter attached to the light. You can see on the extreme edges where it shows through. This essentially means that unless I crop the shot, I can’t make use of this setup.

fv-r300-03
–Adding all of the filters (milk and daylight) means even more interference in the frame

By trying my Rokinon 7.5mm f3.5 fisheye lens essentially means I have to mount the camera at 90-degrees from the factory mount:
fv-r300-04 fv-r300-05
–In this shot, the battery is actually behind the camera. I could build a bracket to mount the camera this way and I’m considering it frankly. The closer I can get my camera out the hole of the ring, the better!

Here is a shot taken from this configuration:
fv-r300-06
–You can clearly see that there is just no way you can use a fisheye lens with this light. The field of view is just too extreme.

In conclusion, I think the F&V light is a fantastic product for full-frame DSLR’s with large lenses. However, using mirrorless / crop sensor cameras may be a challenge to get things to fit without difficulty. Now if the body of the light was much thinner, this may make its use with more compact cameras more possible but right now I’d avoid this unless you’re willing to do some mechanical fabrication to make things fit.

fv-r300-07
–I think for starters I would have mounted the battery on the opposite side because most camera grips are on the right. I would actually have preferred if the body was even wider (maybe with options for more light) as it would have also cleared my camera body being further out. Another option can be to place the mounting bracket in your choice of 2 locations on the back to allow for options like where to place the battery in relation to the body of the camera. Also putting the brightness dial on the side of the light would have allowed for more mounting options. Something to consider F&V (I really hope you’re listening)…

Jul 142013
 

I’ve been playing around with my Rokinon 7.5mm f3.5 fisheye lens on my GH2 and thought I’d share some of the final results. Most of these pics were done in some fairly low light conditions with a lens that isn’t very fast so it came out quite grainy. I compensated for that with a lot of post-production cleanup and eventually went for the “newspaper clipping photo” look. I am really becoming a fan of black and white photography as I just love how it brings out texture. In any event, here you go…

fisheye01 fisheye02 fisheye03 fisheye04 fisheye05

Mar 022013
 

Well after many side jobs and saving, I finally managed to purchase both an ENG and anamorphic lens. It took several additional weeks to get the accessories to allow them to mount and work on the GH2 but I’m finally there…

[click to enlarge]

[click to enlarge]

My big problem now is that I can no longer use my current hand-held rig to run the camera…


[click to enlarge]

[click to enlarge]

As you can see from this overhead shot, the length of these new lenses forces me to begin building a rail system for my camera (what I was trying to avoid). The 20mm pancake lens is at the bottom for a size comparison… Back to the drawing board for me!!

Feb 162013
 

After many months of trial and error, I think I finally have a handheld video camera rig I’m happy with. Until I start using anamorphic lenses, this may be the setup for me for the time being…

[click to enlarge]

[click to enlarge]

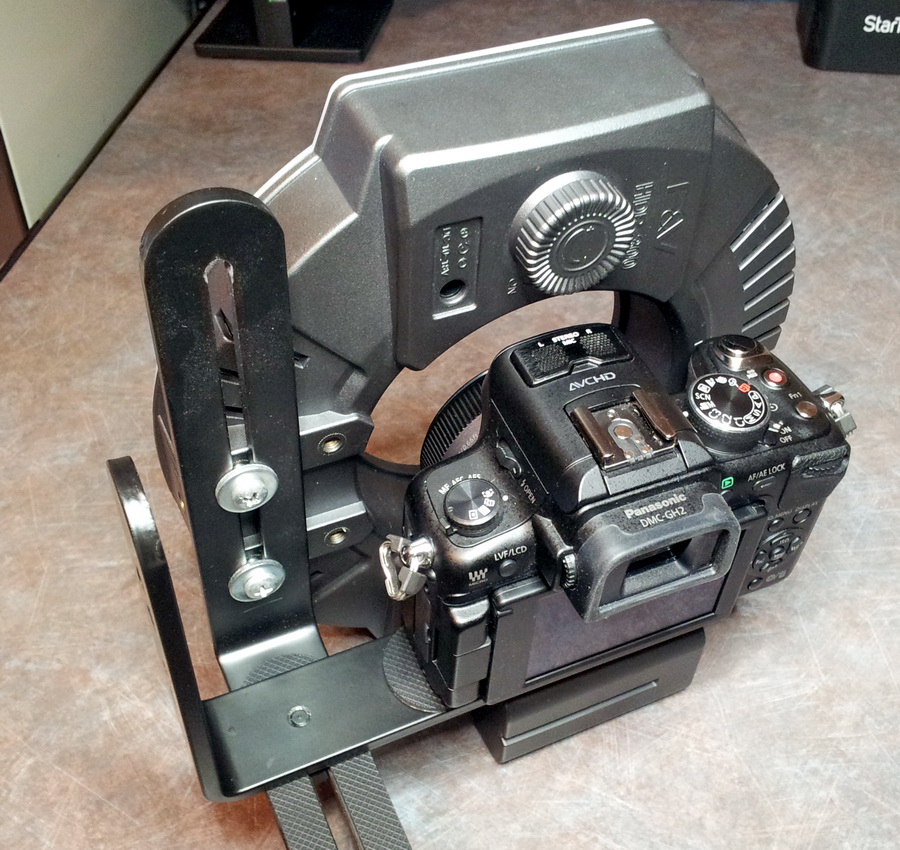
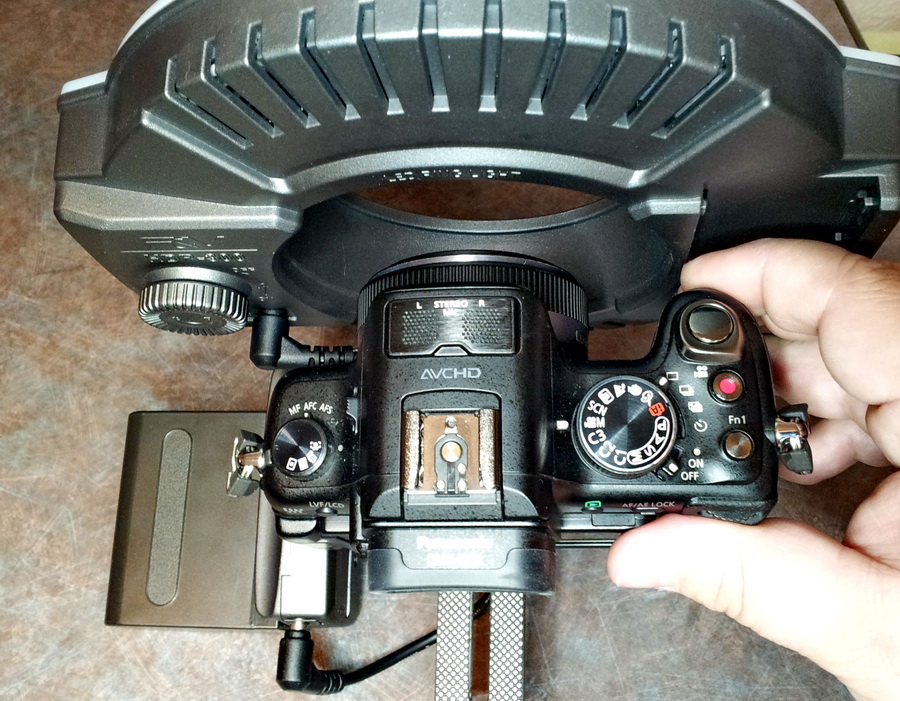
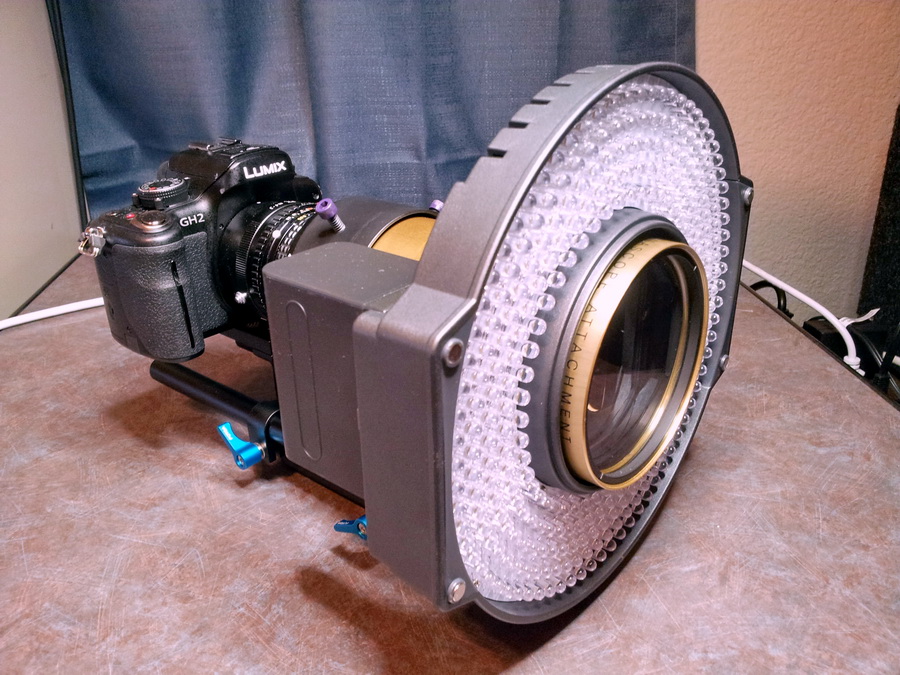
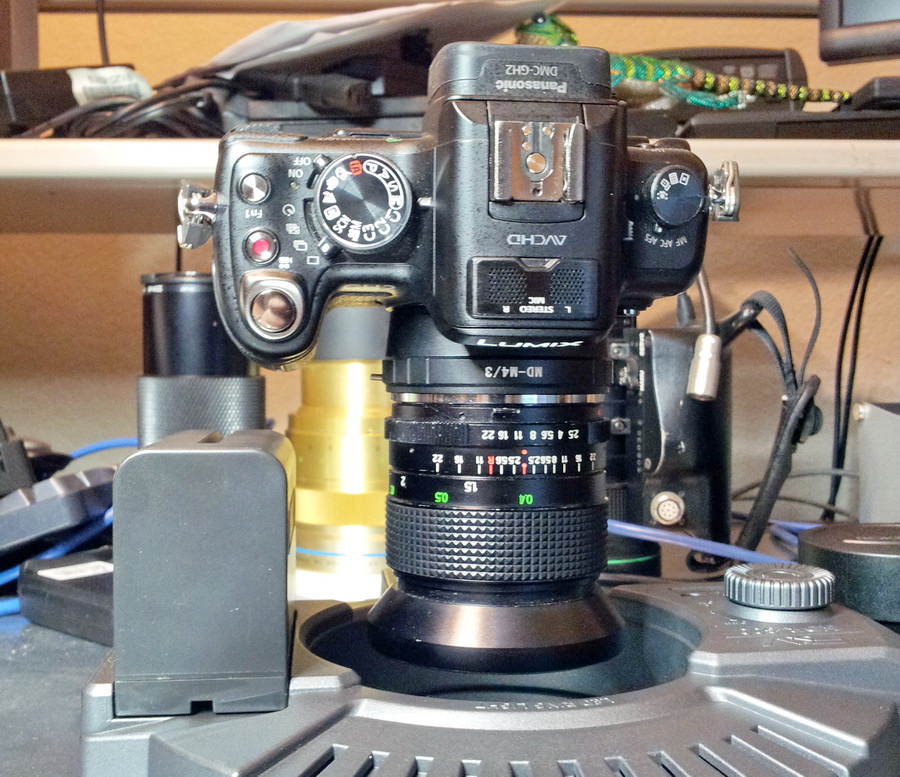
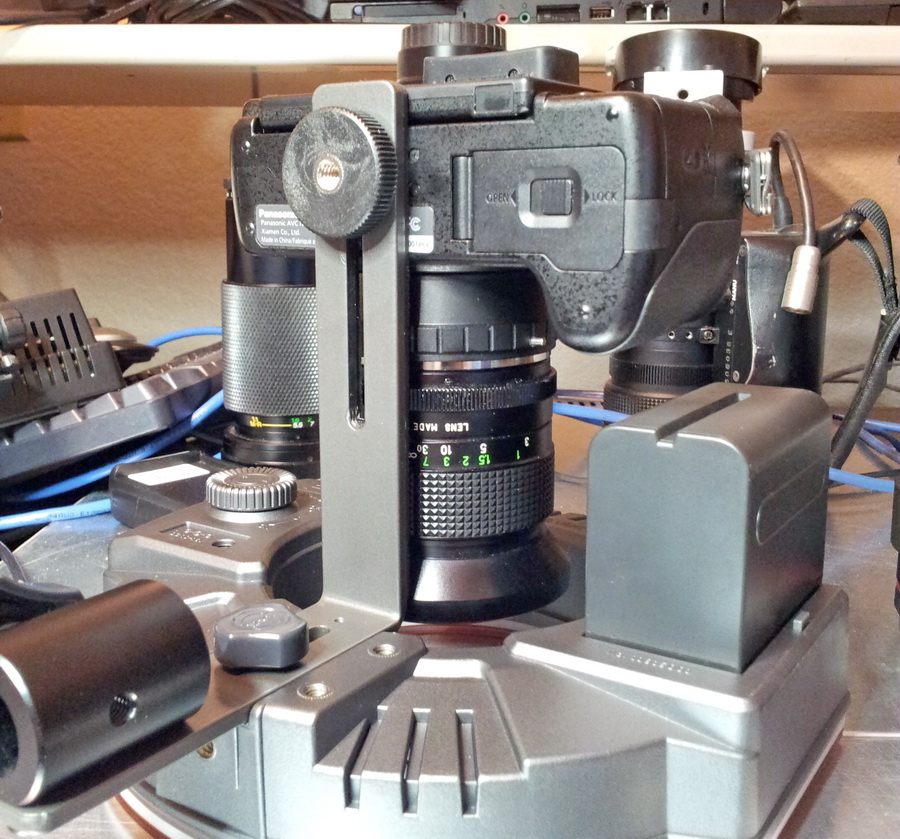
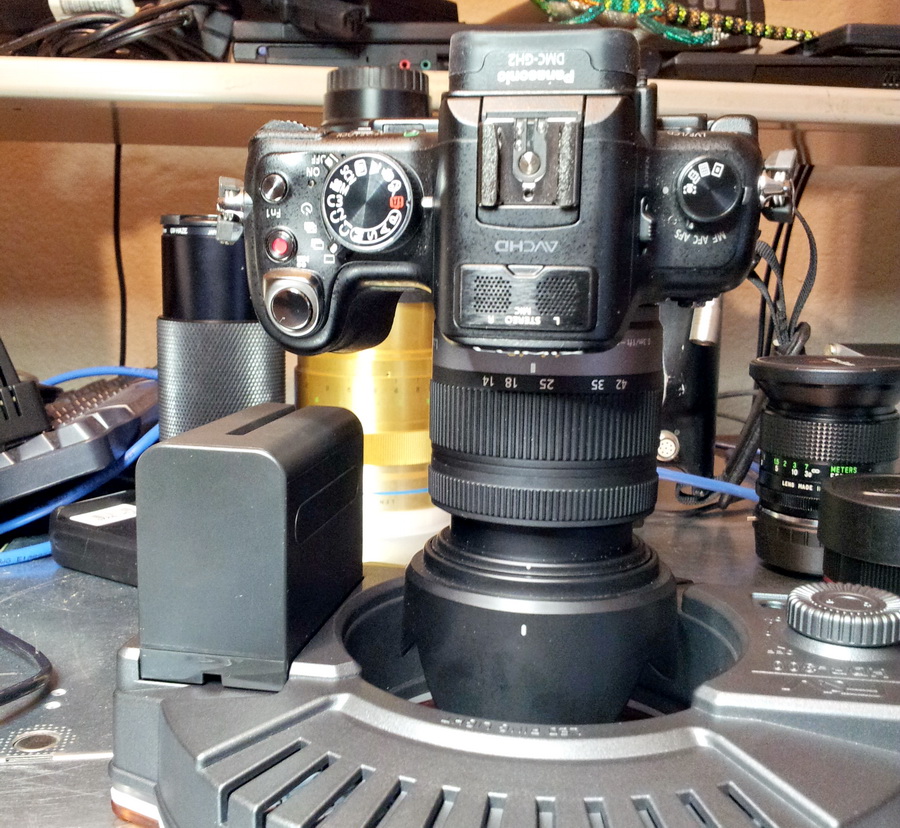
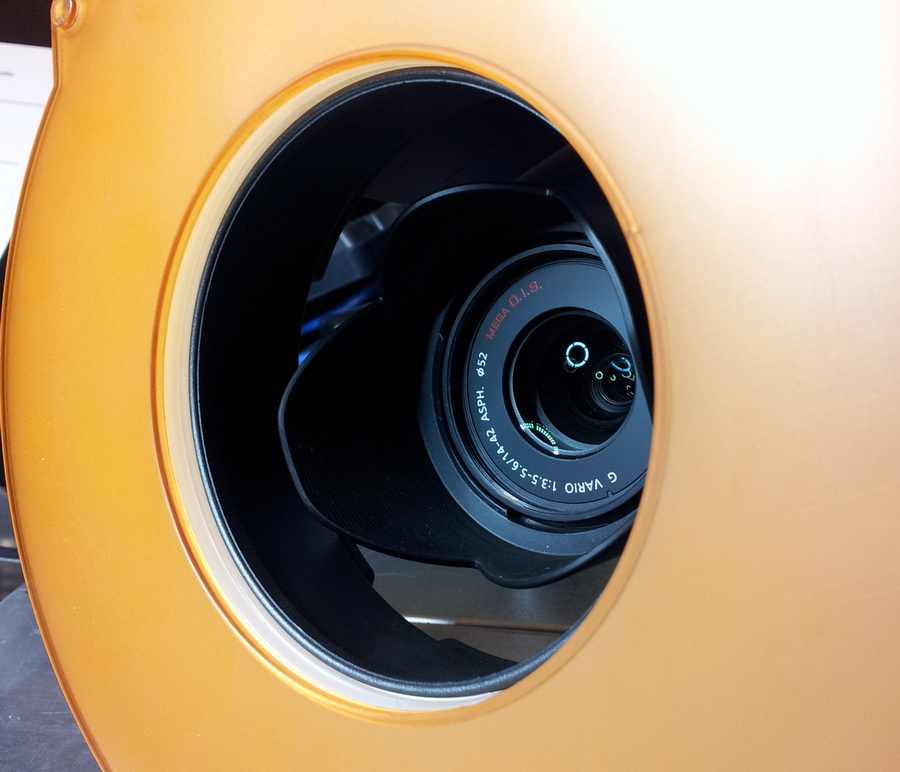
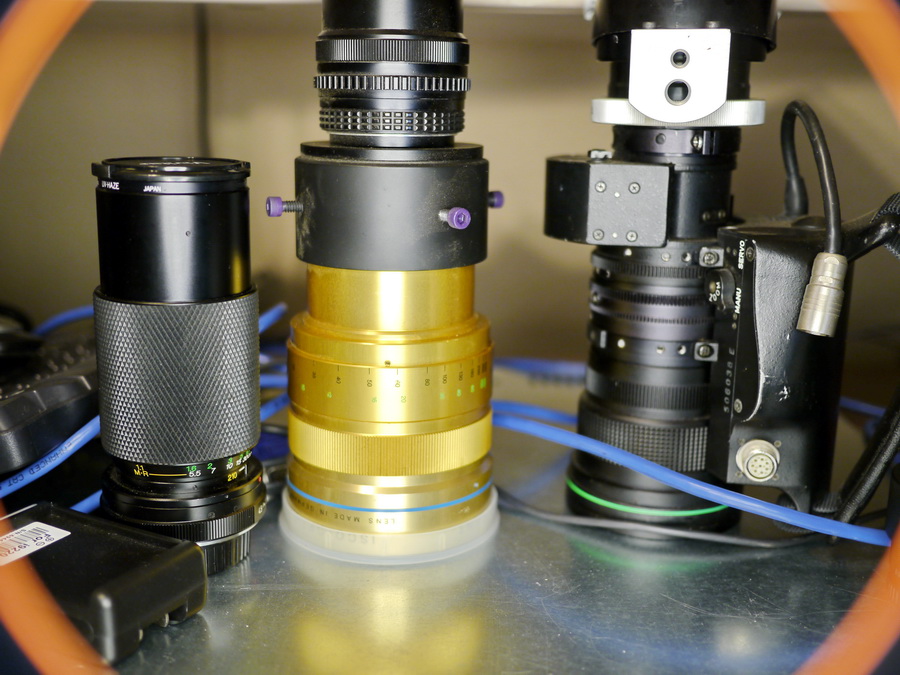
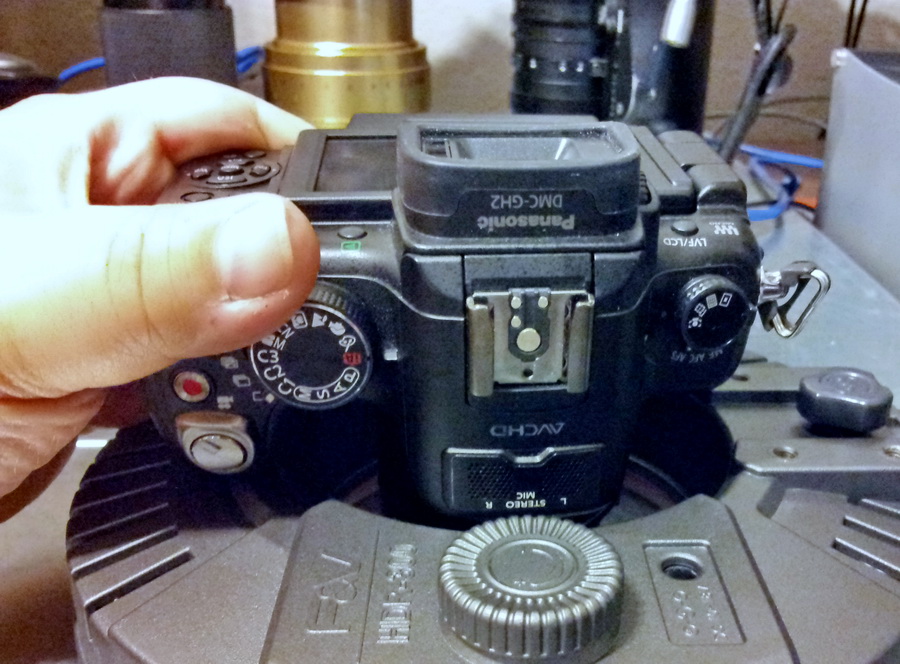
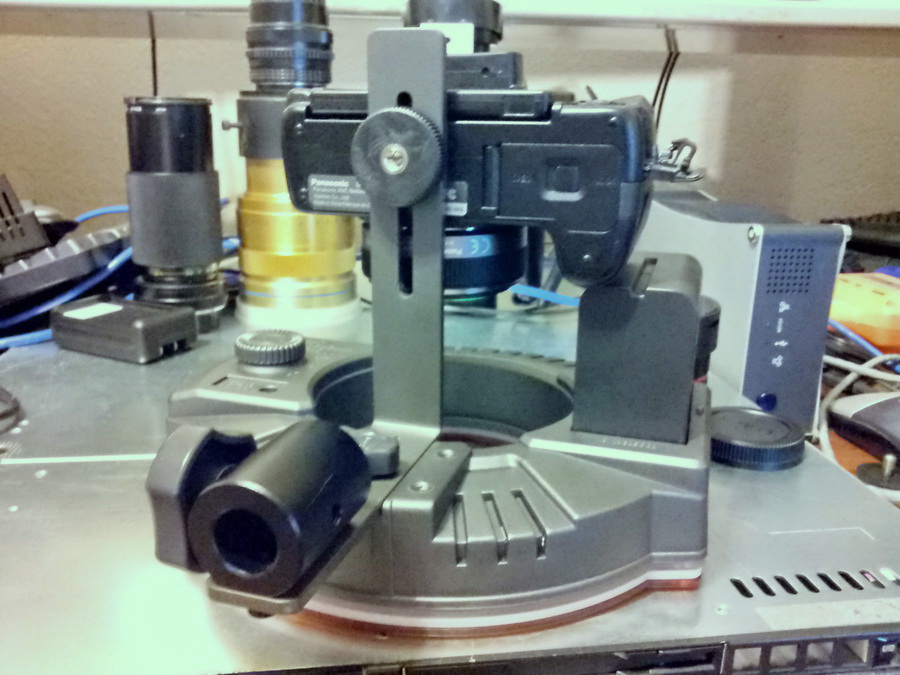
Fully battery-powered, I’ve only tested it continuously for about 40 min but I’m estimating that I can last for a good hour –maybe 90 min without changing batteries. Starting with the camera, I am using a soon-to-be-hacked Panasonic GH2 that I simply could not be happier with. The picture quality is superb (and will only get better after the hack). The lens choices are virtually unlimited when using adapters. I am currently using a Panasonic 20mm f1.7 Pancake lens for a number of reasons but mainly I like the shallow depth of field, amazing low-light performance, and acceptable auto-focus. I will probably move away from auto-focus with my next rig but I am certainly enjoying it while I use it. For more controlled camera work, I fully expect to build a rail system with a follow-focus system but for the time being this has been working quite well. I occasionally have focusing delays when moving shots but for simple “people shots” I’m doing, I’m pretty happy…

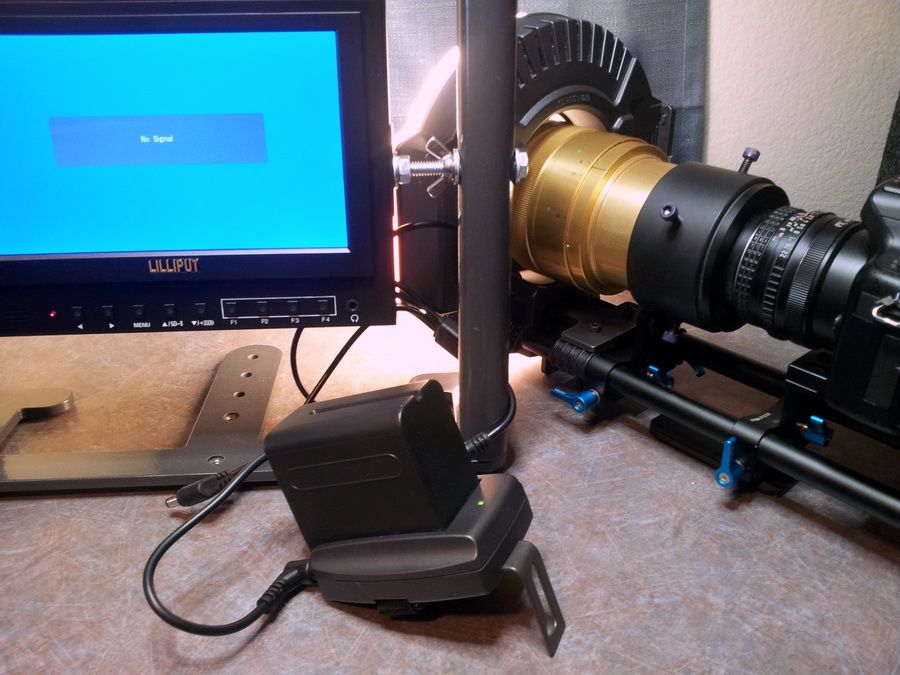
The rig’s frame is from Cam-Rak.com. I managed to find them on eBay and got one of their Mark V units for a really good deal. I was initially afraid that the height would be too much but then I managed to unbolt the top bracket and reverse it. That worked for some time (mounting lights from below as opposed to the top) but once I decided to mount a Liliput field monitor, I moved the bracket back to the original position and never looked back! I experimented with many different methods of mounting the field monitor but ultimately wound-up drilling into the side of the vertical rails and inserting 1/4-20 2.5″ bolts with wingnuts to adjust the tension…

[click to enlarge]

[click to enlarge]

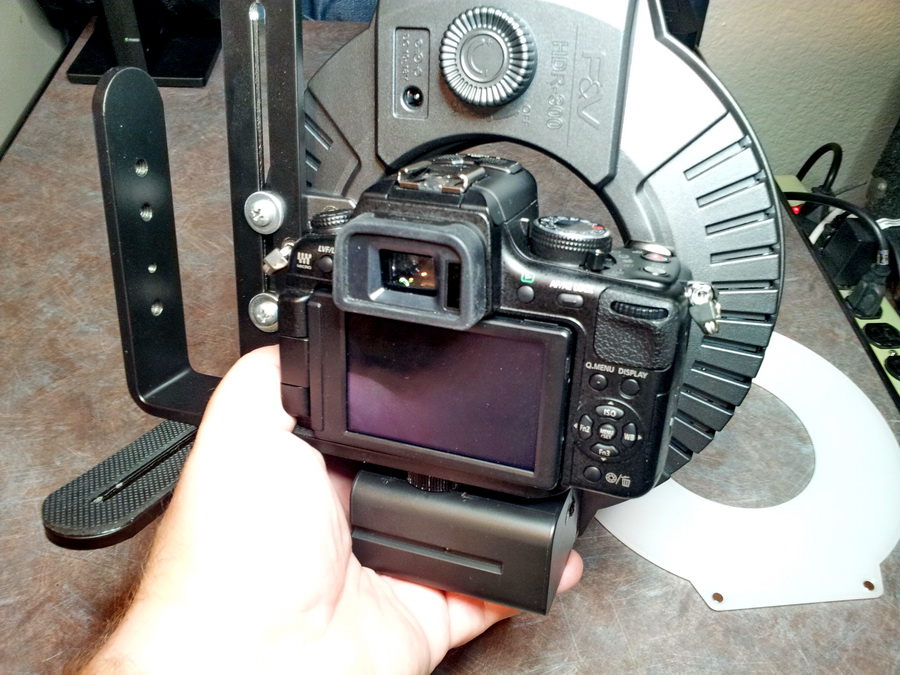
This turned out to be a fantastic solution. The height of the Cam-Rak frame was perfect for this application and now the field monitor is supported securely on both sides –and I can easily tilt the monitor depending on my viewing angle. Next I mounted the Zoom H4N digital recorder to the frame using some plastic clips I ordered when testing out ways to mount the field monitor. I don’t think this will be the final form of this mount but for now it works great. These clips (ordered on eBay from China) are just plastic and can break if tightened too much (as I found out). But supporting the H4N is not an issue at all. I simply may wind up drilling another through-hole and running more 1/4-20 bolts –but I do like being able to angle the direction of the recorder when needed. This may not be too much of an issue as most of the time my subject is holding this recorder just below view. Also, I may start resorting to a boom operator for sound.

[click to enlarge]

[click to enlarge]

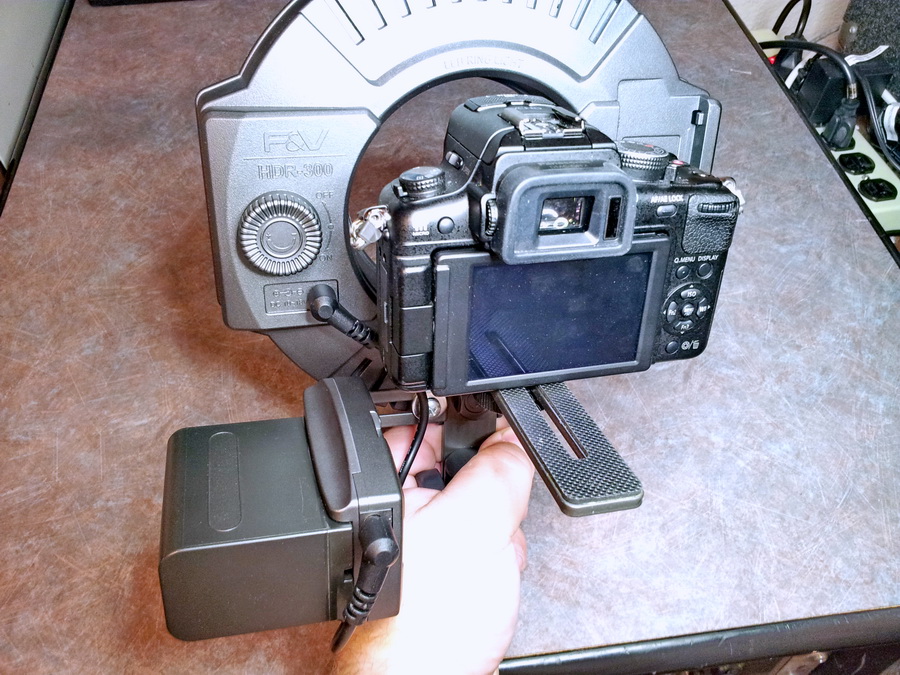
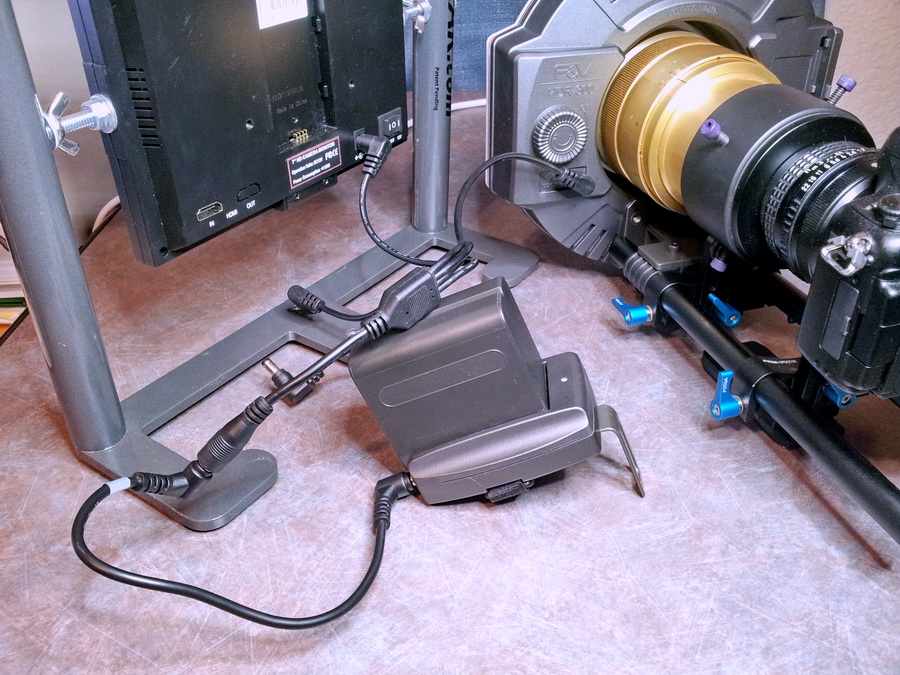
For lighting I went with a pair of  Neewer CN-160 dimmable lights. At $30 each, you can’t go wrong. They get super bright, have a slot for gel coloring, and run on standard NP-F550 batteries (as well as AA’s if need be). When I need them, they’re great. Ultimately, I am aiming for a ring light from F&V and may have to change my rig somewhat, but these are working quite well for now. My field monitor is the Liliput 5DII-8. It also runs on an NP-F550 battery which means I can buy a 3-pack along with a few I already have for spares and I’m all set…

[click to enlarge]

[click to enlarge]

Some of the little things that were needed to pull this rig together came very slowly. I would begin to think of things I may need, order them from China, wait 3 weeks, and find out that it wasn’t the best thing. Each time I thought I’d get something else, it was another 3 week wait for delivery. Still, in the end, I’m very happy with the result –and for very little money relatively speaking. Some of the small details were the clamp for the H4N (the 2nd design I tried to use on this rig). It was a challenge because most camera rigs today run on 15mm rails and not 25mm vertical bars. I’m still not completely happy with the clamp I’m using but it seems to be the best available that I can find. The 1/4-20 screw post that came with the Cam-Rak system broke within days of use from the plastic head that was glued to the screw. I thought I’d find a more sturdy replacement and wound up with another wonderful China-based supplier for the all-metal mounting post I now use. I’ve also added a nice 1/4-20 fender washer and rubber washer under the camera…

gh2rig005

[click to enlarge]

Some near-future upgrades I’m considering (besides the F&V ring light) would be a unified / centralized battery system. Since I’m running both my lights and field monitor on extended camcorder batteries, it would make sense to simply replace those 3 big batteries for just one large battery with 3 outputs. They all run on 12v so I don’t see why this wouldn’t work. Still, that is a back-burner project now that this rig is up and running. I also have AC adapters for every single component on the rig –including the GH2 camera itself. This has allowed me to record several hours of continuous video without any trouble (having large memory cards helps too). Still, a central battery system may also lighten the rig somewhat too. Actually, I’m not as disappointed with the weight as I thought I would. I expected the Cam-Rak frame to be lighter by itself that it turned out to be (especially because it is aluminum). However, the total weight has helped with stability tremendously and maybe I just need to exercise my arms more anyways!! Still, if I intend on using anamorphic lenses in the future, I’ll need extra lens supports that I just don’t see this rig making possible. This would mean going to a shoulder-mounted rail system –but I’m going to hold off on that as long as I can. Then again, I’m just having too much fun using this thing!!


Dec 082004
 

I took this shot out of sheer amazement. This was a box of gravel taken from the demolition of my brick and concrete barbecue I did this summer. A little rain these past few days and look what you get!


I didn’t even realize there was suitable soil in that box (other than dust and pebbles from the concrete I pounded out with a sledge hammer). Goes to show you, life can spring up just about anywhere!

Dec 082004
 

Well it’s looking like I’m going to be approved for working 4-10’s as my work schedule. That means that I’ll be working from 7am – 6pm. This means that I’ll be leaving for work at 5am and getting home at 8pm. That’s a 15 hour day!!!! Well the idea is that I’ll be able to take Wednesday off and then I’m only doing this for 2 days in a row -with a day to recover afterwords. This way I’ll be able to market myself to other businesses and do more side work than just my Saturdays for a few hours. I’m going to give this schedule a try next week and see if I can hack it…

===============

I’m pretty proud of this photo:

–click on the image for a larger view–

I managed to take it off the 14 freeway just North of the Ave-I on-ramp. I’ve wanted to snap a shot of that falcon for a year now and finally had a spare moment (and the camera) to make it happen! I’m pretty happy with the result.